Contributing Guide
Frontity, as an open-source project, welcomes everyone to contribute to code, so we are trying to make it as easy as possible.
The most common way to suggest improvements or changes to Frontity (and most of the projects) is to fork the Frontity project to your own repository and make there all the changes you want. Once you consider they are okay, make a pull request to submit your contribution to Frontity.
Before starting, the only prerequisite is to have Node.js 10 installed in your computer.
Quick guide
Fork the official Frontity repository to your user account.
Clone your fork to your local machine
Run
npm installfrom the root folder.Run
cd examples/mars-theme-example/to go to the example directory.Run
npx frontity devto start Frontity with mars-theme on localhost:3000.Make any changes you consider to the code.
Run
npm testfrom the root to check if the fork passes the tests.Run the e2e tests
cd e2e && npm i && node e2e.js --cypress run —prodcommitandpushto your fork.Open a Pull Request explaining your changes.
Step by step guide
1. Fork the official Frontity repository:
You can go to our repository, click on "Fork" at the right-top corner and select your user.

After doing this, you will create Frontity project at your own repository so you can access and modify it at: https://github.com/YOUR_USERNAME/frontity/
2. Clone your own fork:
In order to run the code from your local machine you have to clone your forked "Frontity" repository.
If you are not using a Git Graphical User Interface (like GitKraken or SourceTree), you can clone your fork from the console by doing the following:
This will create a folder named “frontity” inside the directory from where the git clone command was executed.
3. Run npm install on the root folder:
Run npm install from the root of the Frontity project ("frontity" folder)
Make sure you don't run this from any of the packages folders.
frontity repository is a monorepo multipackage. Because of this you don't need to run npm install on any package under packages folder. By running npm install from the root all dependencies packages under packages folder will be properly installed
4. Check the behaviour of your changes from an example project
To view the result of your changes you can use some of the example projects that are under the examples folder
These Frontity projects are also part of the monorepo multipackage so:
You don't need to do
npm installindividually on these example projects. The installation of dependencies in all packages of the repo (including these example projects) are handled globally by thenpm installdone from the root offrontity(step 3)The dependencies are installed in a way that are linked to the proper portion of code in the repo. This means that changes in the code will be reflected in the project
You can use these projects to check the behaviour of the Frontity core code and the code of the packages used in the project
If the package you want to check is not a dependency of the example project you'll have to add it to be able to properly check it
5. Run your local server:
To check your modifications, choose one of the projects in the examples folder and, for example mars-theme-example, and run npx frontity dev. This will start Frontity with mars-theme on localhost:3000 and it will open automatically a new tab on your browser.
You can also run npm run build:watch to automatically execute npm run build every time you save changes in the code of the packages that run before Webpack, like file-settings, babel-plugin-frontity or the scripts of core
6. Make any changes you consider:
Now you have the proper environment to do changes to the code (core and packages used by the example project) and check the behaviour. Changes you do in the code should be reflected in localhost:3000.
After adding/removing dependencies to any package.json (on any package under packages folder), you must go back to the root and do npm install again as you're working in a monorepo multipackage.
7. Run the unit tests:
Once you have finished adding changes to Frontity, your code must pass all the unit tests. Run npm test from the root folder. This command will tell you if your code pass all the tests, or if there's some test failing.
If you find some errors, you can try:
Run
npm teston a package to detect where is the problem.Run
npm run test:ciin the root to pass all tests without cache. It is useful for TypeScript tests.
8. Run the e2e tests:
Your code must also pass all the end-to-end tests.
Go to the e2e folder and run:
You need Chrome installed in your computer.
If you need to run the e2e tests in development mode, run:
and Cypress will open.
Complete information about the e2e test in this README file.
9. Commit and push to your fork:
Again, we recommend you to use a Git Graphical User Interface like GitKraken, but it can also be done from the command line if you want.
10. Open a Pull Request
At this point, your fork should be ready to be merged to Frontity, so you can open a Pull Request (PR) and we can review it. Make sure to select a descriptive name and follow the template.
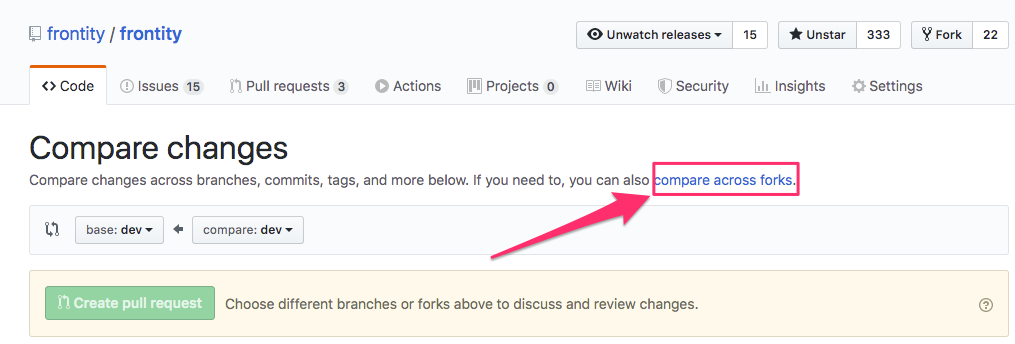
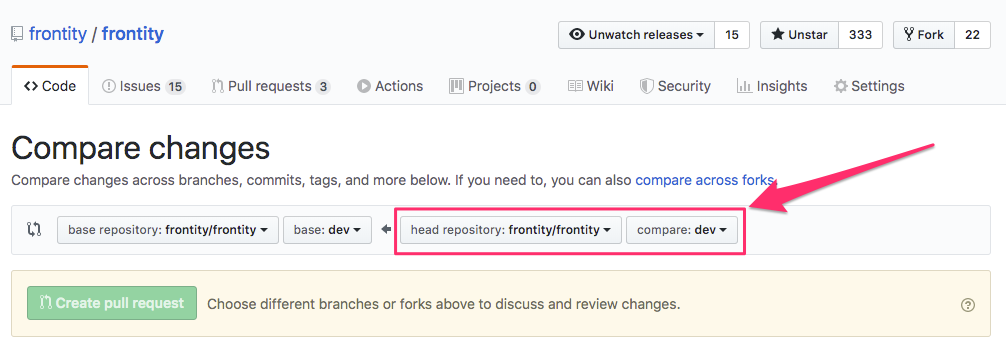
For opening a PR you have to go to Frontity's pull requests page and select compare across forks.

Select your own repository and the dev branch on Frontity, and create the pull request.

Commit messages
Commit messages are one of the most common ways developers communicate with other developers so it’s important that your commit message clearly communicate changes with everybody else.
In Frontity, we follow the seven rules of Chris Beams:
Separate subject from the body with a blank line
Limit the subject line to 50 characters
Capitalize the subject line
Do not end the subject line with a period
Use the imperative mood in the subject line
Wrap the body at 72 characters
Use the body to explain what and why vs. how
Additionally, you can add a scope followed by a colon. Sometimes it may help clarify and shorten the message:
Remember to capitalize the subject again after the colon.
For a more detailed explanation please read the excellent article of Chris Beams and the guide of WordPress VIP:
Code comments
For code comments, we follow these guidelines:
Write your comments in plain, valid English.
Capitalize the first word and end with a period.
Use the imperative mood.
Break the line at 80 characters.
Use TSDoc for all the types, interfaces and functions.
1. Write your comments in plain, valid English
2. Capitalize the first word and end with a period
3. Use the imperative mood
4. Break the line at 80 characters
There is a VS Code extension to do this automatically: https://marketplace.visualstudio.com/items?itemName=stkb.rewrap
5. Use TSDoc for all the types, interfaces and functions
You can find more about TSDoc at the official repository: https://github.com/microsoft/tsdoc
Coding Standards
Most of the coding standards are enforced by our EsLint and Prettier configuration. Please make sure you have both installed in your editor. For VS Code, the extensions are:
You don't need to configure anything, the default configuration is fine.
Apart from those, please pay attention to these other points:
Use
interfaceovertypewhenever possible.Use an
interfacewhen functions have object arguments.Add a line break between TSDoc comments.
1. Use interface over type whenever possible
interface over type whenever possibleUse
Instead of
2. Use an interface when functions take an object as an argument or when functions return an object
interface when functions take an object as an argument or when functions return an objectInstead of typing the objects inline, use a separate interface to be able to document the object using TSDoc. Use the @link tag to link the interface and function together.
For functions that take an object as an argument use:
Instead of:
For functions that return an object use:
Changelogs
We use Changesets to manage our versioning and changelogs.
What is a changeset
A changeset is a piece of information about changes made in a branch or commit. It holds three bits of information:
What we need to release.
What version we are releasing packages at (using a SemVer bump type).
A changelog entry for the released packages.
If you pull request has changes that need to be released in a new version of some of the packages, you need to include a changeset file in the pull request.
How to create a changeset
Run the command-line script
npx changeset.Select the packages you want to include in the changeset using ↑ and ↓ to navigate to packages, and hit
spaceto select a package. Hitenterwhen all desired packages are selected.You will be prompted to select a bump type for each selected package. Select an appropriate bump type for the changes made. Those are:
Major version: when you make incompatible API changes.
Minor version: when you add functionality in a backward-compatible manner.
Patch version: when you make backward-compatible bugfixes. See here for information on SemVer versioning.
Your final prompt will be to provide a message to go alongside the changeset. This will be written into the changelog when the next release occurs.
After this, a new changeset file will be added, which is a Markdown file with Yaml front matter.
You can write as much Markdown as you want
The message you typed can be found in the Markdown file. If you want to expand on it, you can write as much Markdown as you want, which will all be added to the changelog on publish. If you want to add more packages or change the bump types of any packages, that's also fine.
A good idea of what should be in a changeset is:
What the change is.
Why the change was made.
How a consumer should update their code.
Once you are happy with the changeset, commit the file to your branch.
You can add more than one changeset to a pull request
Changesets are designed to stack, so there's no problem with adding multiple. You might want to add more than one changeset when:
You want to release multiple packages with different changelog entries.
You have made multiple changes to a package that should each be called out separately.
For more detailed information on changesets please read their guide.
Still have questions? Ask the community! We are here to help 😊
Last updated